- Home
- Moodle
- SIS2-Moodle integration
- SIS1-Moodle integration
- Basic features of Moodle
- Adding and creating study materials (resources)
- Communication in Moodle
- Submitting homework in Moodle (activities)
- Creating a quiz in Moodle
- Group work in an e-course
- Grading learners in Moodle
- Teaching a course
- Taking attendance
- Transferring grades from Moodle to SIS exams results report
- Resetting a course in Moodle
- Moodle instructions for students
- Sisu@UT
- Panopto
- Mahara
- LimeSurvey
- Webinars
- Plagiarism detection

Guides for e-learning tools
Creating a multilingual site
Multilingualism is created using the WPML Multilingual CMS plugin, which allows you to add languages and translate the content of pages, posts, menus and other elements. You need to complete the following steps:
1. ACTIVATING AND CONFIGURING THE WPML PLUGIN
PS! Since setting up a multilingual site might be complicated, please contact eope@ut.ee if you get stuck and we will advise you on setting up the WPML plugin and creating a multilingual site.
After activating the WPML Multilingual CMS plugin, set up WPML by clicking WPML, Setup in the left-side menu. The default language is the language originally set for the site. In the Translation languages section, you can add one or more translation languages with the + sign.
We recommend using the following settings:
-
How would you like to format your site’s URL? – Different languages in directories
-
Context and Target Audience – You need to add a title, description, and target audience for your site, save the data using the Save and Finish button, and move on by clicking the Continue button.
-
I’d like to set up human translation by – Only myself
If you add more users to your site later, they must be given translator rights: WPML – Translation Management – Translators (tab). PS! Add rights to translate in both directions. - Do you want to get better and faster support? – No, don’t send this information and skip maintenance alerts
-
Improve your site’s translations using helpful plugins – do not select String Translation and Advanced Custom Fields Multilingual components (click Skip)
- Click Finish
2. OPTIONS FOR ADDING TRANSLATIONS
There are different options for adding translations to pages. Before adding translations, think carefully about how you are going to add translations. If you want some translated pages to have shorter or entirely different content than the content in the original language, you should make them as separate pages and set the language of these pages as the translation language. Then, in the translated page’s edit view, you should link that page to the corresponding original language page (Option I). If the entire content of the page is exactly the same in the original and translated languages, you can choose the option of adding translations to the original language pages (Option II).
If a page has a translation in another language, the language change links appear in the upper right corner of the page (e.g. ET and EN).
Option I. Translation pages already exist
Original and translated pages must be created separately and the translated pages must be linked to the corresponding original pages.
- On the left-side menu go to – Pages – All Pages.
- Open the translation language page in edit view. Remember the title of the corresponding original page.
- In the settings menu on the right, look for Language and set a translation language to the page (eg English) from the drop-down menu if it is not already there.
- Then the page must be made public (if it has not already been made public) after which the option Connect with translations will appear under the language selection of the page.
- Click on it and find the corresponding original language page by entering the name of the original page you want to associate the translated page with. If the original language page has not been created yet, create it in advance and set the language of this page to the original language.
- After choosing the corresponding original page, remove the check mark in the next window (if you do not want to change the language of the original page to the translated language).
- Click Assign.
- In the next window, select Edit anyway and you can also add the check mark to avoid repeating this same selection in the future.
Option II. Original pages don’t have separate translation pages
Original language pages must first be created and then translations added to them.
On the left-side menu go to – Pages – All Pages. Translations can be added in the column with the language flag using the + sign (e.g. Add translation to English).
When adding translations, the translation of each paragraph must be added in the corresponding box and saved when done. At the very end, all the added translations on the page must be saved.
If you use the + sign to add translations, you must keep in mind that all the sections of the page must be translated (nothing can be left untranslated). If you have already made a translated page separately or are planning to do so, then do not add translations with the + sign, because otherwise it will not be possible to link the original language page to the translated page.
If you want some of the content on any of the translated pages to be shorter or to have different content than the content in the original language, you should create the content of that page in another language as a separate page and set the language of this page as the translation language. (Option I)
3. CREATING A TRANSLATION LANGUAGE MENU
If the pages have been translated in the original language or the pages in the original language are linked to the corresponding pages in the translated language, the next step is to create a menu for the translated language.
To do this, go to Appearance – Menus on the left and switch the view to the translation language from the page header.
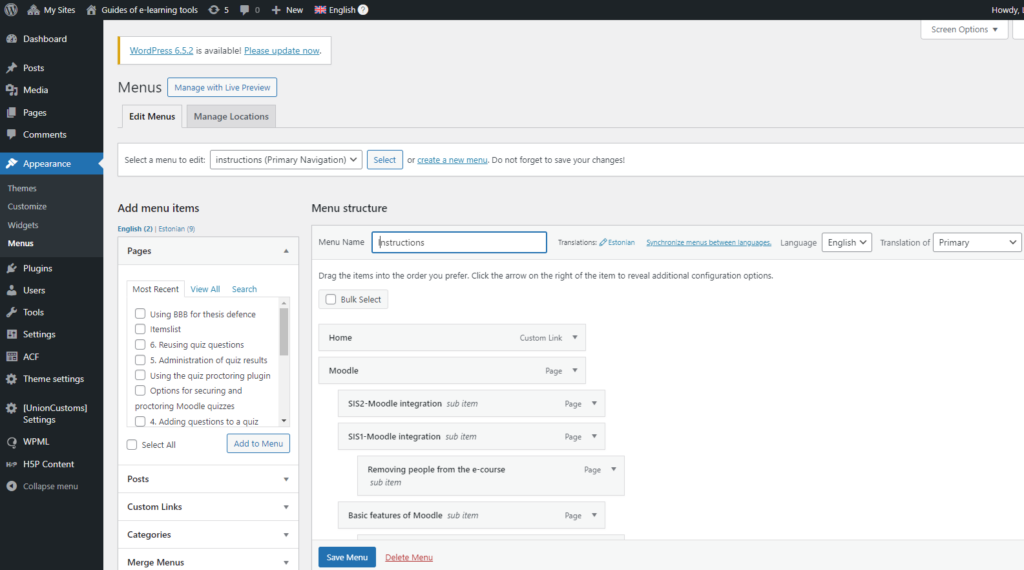
Create the translation language menu and specify which original language menu it is a translation of.
Save the menu by clicking the Save Menu button at the bottom.
4. CHANGING AND SAVING MULTILINGUAL PAGE SETTINGS
If WPML is used on the website then the Theme Settings (including website publishing) must be reviewed, changed and saved for each language separately using the language switch button in the top menu.
5. ADDING CO-TRANSLATORS
If you are the only person on your website who needs to edit the content of pages in both languages, you do not need to add co-translators. However, if you have other people on your website with editing rights (e.g. co-administrators) who should also be able to edit the content of pages in different languages, you need to add them as co-translators: in the left menu WPML – in the top menu tab Translators – Add a Translator – you give them the rights to translate from a certain language to a certain language. This way, they will have a link to edit multilingual pages in the top menu.

6. ADDING A TITLE IN ANOTHER LANGUAGE TO THE BANNER
Titles in different languages are usually added to website banner as well, depending on the language. To change the title, you must first activate the WPML String Translation plugin. Then, from the left menu open Settings – General – select the translation language from the top menu and replace the title in the original language with the title in the translation language. Do the following also for the Description.
CREATING A MULTILINGUAL PAGE WITH A MENU
To create a multilingual page, if you don’t need to translate all the pages from the original language, you can also use a standard layout with a top and side menu bar. In this case, elements with language names must be added to the first level of the primary menu, and the content pages of the corresponding languages must be added as sub-elements. For this implementation, there is no need to activate the WPML Multilingual CMS plugin.