- Home
- Moodle
- SIS2-Moodle integration
- SIS1-Moodle integration
- Basic features of Moodle
- Adding and creating study materials (resources)
- Communication in Moodle
- Tips for adapting assessment for distance learning
- Submitting homework in Moodle (activities)
- Creating a quiz in Moodle
- Group work in an e-course
- Grading learners in Moodle
- Teaching a course
- Taking attendance
- Transferring grades from Moodle to SIS exams results report
- Resetting a course in Moodle
- Moodle instructions for students
- Sisu@UT
- Panopto
- Mahara
- LimeSurvey
- Webinars
- Plagiarism detection

Guides for e-learning tools
SIS1-Moodle integration
I Creating the blank Moodle courses
1. For subjects registered in SIS, lecturers can create blank Moodle courses from the respective syllabus.
NB For creating a blank Moodle course from SIS it is assumed that the syllabus for the respective subject is shown in SIS as blended or online. If syllabus is not blended or online it should be set up as one (Change course data).
Separate blank courses can be created for the same subject in regular, block-mode and continuing education programmes. For creating a blank Moodle course click the button „Manage Moodle links” at the syllabus in SIS and thereafter, in the opening window, click on the button „Create a new Moodle course”.
NB Based on SIS, you can create courses on your own on the blank slate only. If you wish to make a copy of an earlier Moodle course or a blank course for a subject unregistered (as yet) in SIS then contact the e-mail address eope@ut.ee, informing about the title of the course to be created, the subject code and the name of the course when wishing to make a copy of it.
2. Design the course as you wish or need.
The designing of a Moodle course means designing the course environment, adding necessary tools and materials to the course, and fixing the settings of the course.
1. Decide what you want to grade and on which scales
Activities you can grade/rate:
- Activities which are completed or submitted on the e-course
- Activities which are completed in the classroom
The type of rating scales and methods in Moodle:
- Numeric scale – you set maximum points and can choose the integer points from the dropdown menu. Moodle includes numeric scales that range from a maximum of 100 to a minimum of 1. For example, selecting a scale of 10 will allow a rating on a scale between 10 and 1.
- Verbal scale – you can create your own scale using words, numbers or letters. Each level of the scale has the numeric value for the Moodle: the worst is 1 point, the next is 1 point and so on. On every e-course is already the scale Fail/Pass (Instructions).
- Letters – each e-course has only one letter grade scale. You can change the percentages and letters. You can use letters for the total grade of the e-course and for displaying points of activities in the gradebook (Instructions).
- Rubric – enables to create the table with criteria and grade levels with points. You can grade by clicking in the form and adding comments. Moodle calculates the points automatically (Instructions).
- Marking guide – an advanced grading method where you can enter a comment per criterion and a mark up to a maximum. Moodle calculates the points automatically (Instructions).
2. Create scales (in the gradebook)
- Numeric scale – Activity administration leads to a page where the grade type and maximum points can be changed.
- Verbal scale – Course administration – Grades – Scales (Instructions).
- Letters – Course administration – Grades – Letters (Instructions).
- Rubric – Activity administration leads to a page where the current active grading method can be changed and created (Instructions).
- Marking guide – Activity administration leads to a page where the current active grading method can be changed and created (Instructions).
3. Choose suitable activities for grading (Activity Types in Moodle)
- Assignment (numeric + verbal scale + rubric + marking guide)
- Database (numeric + verbal scale)
- Dictionary (numeric + verbal scale)
- Forum (numeric + verbal scale)
- Games (numeric scale)
- GeoGabra (numeric + verbal scale)
- HotPot (numeric scale)
- SCORM-package (numeric scale)
- Journal (numeric + verbal scale)
- Lesson (numeric + verbal scale)
- NanoGong (numeric scale)
- Quiz (numeric scale)
- VPL (numeric + verbal scale)
- Workshop (numeric + verbal scale + rubric + marking guide)
NB! If students complete the activity in the classroom, use the assignment for inserting their grades into the gradebook.
4. Set the grade display type of the activity in the gradebook
Symbols to represent ranges of grades (points) may be set as grade letters (Instructions).
5. Set the grade display type of the final grade (Course total) in the gradebook
The final grade can be differentiated (F…A) or non-differentiated (pass, fail).
- Follow the grades link in the course administration block.
- Select ‘Categories and items’.
- Click the edit icon on the first row.
- From the ‘Grade’ display type menu, select letter.
- Save changes.
NB! If you choose letter with points or percentages, pay attention that letters should be on the first position!
6. Set the grade to pass for highlighting the grades
This setting determines the minimum grade required to pass. The value is used in the gradebook, where pass grades are highlighted in green and fail grades in red.
- Follow the grades link in the course administration block.
- Select ’Categories and items’.
- Change numbers in the’ Grade to pass’ column.
- Save changes.
NB! Check the order of all activities and change if needed. Check the total amount of points (Course total).
7. Set the control of the grades to pass
- Follow the grades link in the course administration block.
- Select ’Categories and items’.
- Click the calculator icon on the last row.
- Add ID numbers for all activities.
- Add the formula.
- Save changes.
Example of the formula which controls the grade to pass is: …*min(round([[ID]]/X,0),1), where ID is the ID number of the particular activity and X is the double grade to pass this activity (Instructions).
8. If you would like to test your gradebook, please turn to your faculty instructional designer.
In case you wish individual supervision with creating your Moodle course, please contact the instructional designer of your faculty/college.
3. Start managing your course.
Managing of a course causes the manager (lecturer/faculty, a department) no financial expenses. Moodle can be implemented in teaching full-time and Open University degree courses as well as in offering continuing education, and as suitable environment for projects and workshops.
II Adding learners to the course
Learners registered for a subject in SIS can be added to the wished Moodle course from the respective syllabus in SIS, creating first a relation in SIS between the particular syllabus and the course on Moodle. If earlier you had created a Moodle course on the blank slate from the SIS syllabus then the relation is automatically there already.
NB As precondition for creating a link is the fact that the respective subject syllabus should be marked in SIS as partially or entirely web-based. If the syllabus is not partially web-based/web-based, it should be set up as such (Change course data).
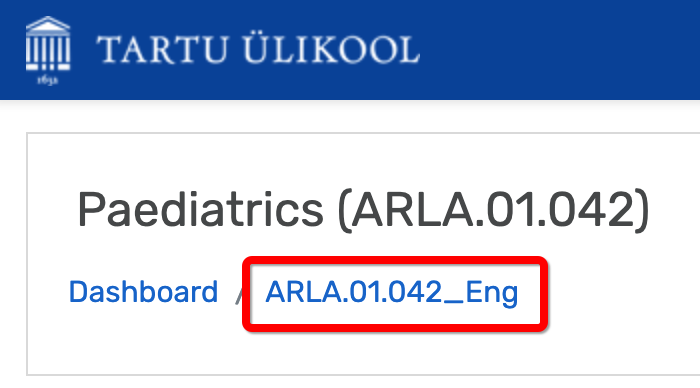
In case there is no link, then in order to establish the link it is necessary at the subject syllabus in SIS to click on the button “Manage Moodle links” and in the opening window click on the button “Link to the existing Moodle course“. Further, you need to enter an short name (on the picture in the red frame) of the wished Moodle course into the textbox.
In order to add learners to a course on Moodle, it is first necessary to click the line “Nightly transfer of learners’ data“, then click on the link “Start” and thereafter on the button “Renew learners’ data on the Moodle course“. If you do not press the last button, subsequent nightly run of learners’ data transfer will start automatically. Transfer of learners’ data from SIS to the course on Moodle can be stopped clicking on the link “Stop” on the line “Nightly transfer of learners’ data“.
Updating students in Moodle
If you have created a link between a syllabus in SIS and a course in Moodle and started the nightly student transfer, SIS will automatically exchange student information with the corresponding Moodle course every night during the semester. Students who have registered in SIS are added to the course in Moodle and those who have unregistered in SIS are removed. The users who have been added to the Moodle course manually in Moodle are not removed from the Moodle course automatically.
NB It is possible to add students to one Moodle course from different SIS curricula (e.g. from non-distance learning and open university curricula). This requires that all those curricula have been linked with the corresponding Moodle course and the nightly student transfer has been started.
NB If you do not add students from SIS to a Moodle course automatically, you need to add students in Moodle manually or grant them access to the required Moodle course with a key. If students enter the Moodle course with a key, you need to send them the necessary information—in which category the course is and what the key to access the course is.
III Forming groups
If students in the SIS syllabus have been registered in groups and students are being transferred to the Moodle course, the same groups are formed automatically in Moodle and students are placed in groups when students are transferred.
Principles of forming groups:
- The same groups as in SIS are created automatically in the Moodle course.
- If student information is updated in SIS, the composition of the SIS groups in Moodle is also updated (e.g. if someone has unregistered from the SIS group, they are removed from the respective Moodle group, if someone changes their group in SIS, their group is changed in Moodle). Groups and members of the groups which are created manually in Moodle by the lecturer are not changed during the updates.
- In the Moodle course, the student can belong to one SIS group and, in addition, other groups which have been created manually by the lecturer and to which they have been added.
- If the Moodle course includes students from several SIS curricula with groups, the Moodle groups are created on the basis of both curricula. If a student is registered to both courses, they can belong to several SIS groups in Moodle.
IV Delivering the course
If the Moodle course is ready, you can start delivering the course. Delivering the course does not require any financial expense from the organiser (lecturer/faculty, structural unit). Moodle can be used for non-distance and open university degree learning and continuing education courses, but also as a work environment for projects and workgroups.
V Transferring grades from Moodle to SIS exams results report
In order to transfer final results from the Moodle e-course to the SIS exam results report or continuing education programme results report, the final results in the final result column of the gradebook in the Moodle course need to be added in the same grading system as in the SIS syllabus and report. With differentiated assessment, the grades are on letter-scale from A to F and with non-differentiated assessment the grades are on the scale pass/fail.
The exam report must be prepared in SIS in accordance with the Study Regulations.
Requirements for importing final results from Moodle to the SIS report (exam results report or continuing education programme reports):
- partially or entirely web-based syllabus in SIS is related to a Moodle course;
- students registered for the course have been added to the Moodle course through SIS;
- final results in Moodle have been entered using the same grading system as in the SIS syllabus and, therefore, the exam report (see the instructions for setting the final grade);
- report status is “registered”.
If you click Change in the registered report, the report has the field Grades from Moodle with links View grades and Add grades to report.
View grades — you can see the grades for this syllabus in the final grade column of the gradebook of the respective Moodle course.
Add grades to report — you can import grades from Moodle to the SIS report. Grades are not imported if
- there is already a grade in the report;
- the grade in Moodle does not comply with the grading system in the report, e.g. the grading system in the report is based on letter scale but in Moodle the scale is pass/fail.
If there is a grade in the final grade column of the gradebook in Moodle which is not from the grading system in the report (data taken from the curricula information in the report), the report displays a warning: Moodle grade is not in the report grading system. The necessary changes need to be made in the SIS syllabus grading system or Moodle.
If there is already a grade in the report but it differs from the final grade in Moodle, a warning is displayed: The grade in the report is F and the grade in Moodle is C. Check the grade and make the necessary changes in the report or Moodle.
NB If the final result is missing in the Moodle gradebook (the student has not entered the Moodle course and/or completed any graded tasks), the SIS report records these students as “not present”.
VI Ending the course
When the course ends, it is recommended to empty the Moodle course (Administration, Reset course). When the course is restored, the relation between the SIS syllabus and Moodle course is cancelled automatically. If the course is not emptied in Moodle, but you wish to cancel the relation between the SIS syllabus and Moodle course, the relation must be deleted manually in the SIS syllabus (Manage Moodle links, Delete relation).