- Home
- Moodle
- SIS2-Moodle integration
- SIS1-Moodle integration
- Basic features of Moodle
- Adding and creating study materials (resources)
- Communication in Moodle
- Tips for adapting assessment for distance learning
- Submitting homework in Moodle (activities)
- Creating a quiz in Moodle
- Group work in an e-course
- Grading learners in Moodle
- Teaching a course
- Taking attendance
- Transferring grades from Moodle to SIS exams results report
- Resetting a course in Moodle
- Moodle instructions for students
- Sisu@UT
- Panopto
- Mahara
- LimeSurvey
- Webinars
- Plagiarism detection

Guides for e-learning tools
Creating groups
If learners have registered into groups at the syllabus in SIS and learners are transferred to the Moodle e-course, similar groups are automatically set up in the Moodle e-course at the moment of transfer, and the learners are added to the groups. These are usually groups for practical classes or seminars. For group work, separate groups or groupings should be created in an e-course.
You can use the group mode in the whole course (Administration – Edit settings) or for individual activities in Moodle. In addition, it is possible to create groupings from the existing groups.
Group mode and groupings may be used to distinguish between learning groups and to assign specific activities or resources to specific groups.
Example:
The course includes three groups that have been transferred from the SIS: stats 1, stats 2 and stats 3. These groups have seminars and you may want to filter the gradebook and assignments according to these groups. In addition, there is online group work in this course and two groups have been manually created for the e-course: Rühmatöö 1, Rühmatöö 2.

To avoid seminar groups and group work groups getting mixed up, you should use groupings. Create two groupings: for example, grouping – seminar (for seminar groups) and grouping 2 (for group work groups) and specify that grouping – seminar includes groups stats 1, stats 2 and stats 3, and grouping 2 contains groups Rühmatöö 1 and Rühmatöö 2.
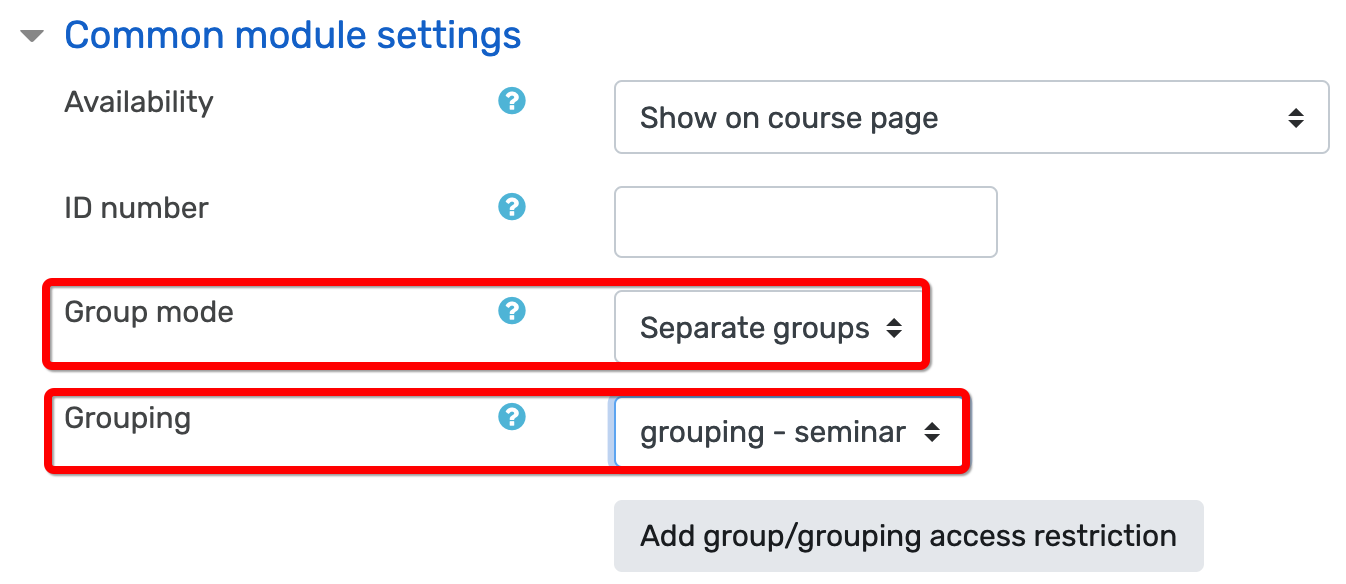
Now, in the resource or activity settings page, under general module settings, you can set that study material x and quiz y are visible for grouping – seminar only, that is, to members of the groups stats 1, stats 2 and stats 3, etc.
It is possible to use two group modes both in the whole course and for separate resources or activities:
- Separate groups – members of different groups cannot see posts of another group (for example, wikis, forum posts).
- Visible groups – members of different groups can see each other’s activities but cannot participate in them.
There are several ways to create groups:
1. Learners have already enrolled in the course:
- Moodle creates groups automatically
- you create groups and place learners into the correct groups
- you create groups and use the Moodle activity Group self-selection, which allows learners to join the group of their choice
2. Learners have not yet enrolled in the course
- you create groups and set for each group a key, which automatically enrols learners into the correct group when they first join the course
- you allow students to enrol in groups in the SIS and the same groups will be automatically created in the e-course as students are transferred
1. Manual creating of groups
- select Administration – Users – Groups
- to create a new group, click on the button Create a group
- On each group settings page, you can also set the group key (only if you want that the learners using the self-enrolment key to join the course are also automatically added to the respective group)
NB! If you want to add learners automatically into the correct group, you should give learners the key to the respective group only, and, although you set the key for the entire course (Administration – Users – Enrolment methods – Self Enrolment (Student) – Enrolment key), you do not share the key with students. With a course key the learners could enrol in a course but not to any groups.
Manual enrolment of group members
- On the groups page: Administration – Users – Groups
- click on the group’s name
- click Add/remove members below the window on the right – all learners enrolled in the course are displayed in the window on the right
- click on a learner’s name and add to the group in the window on the left
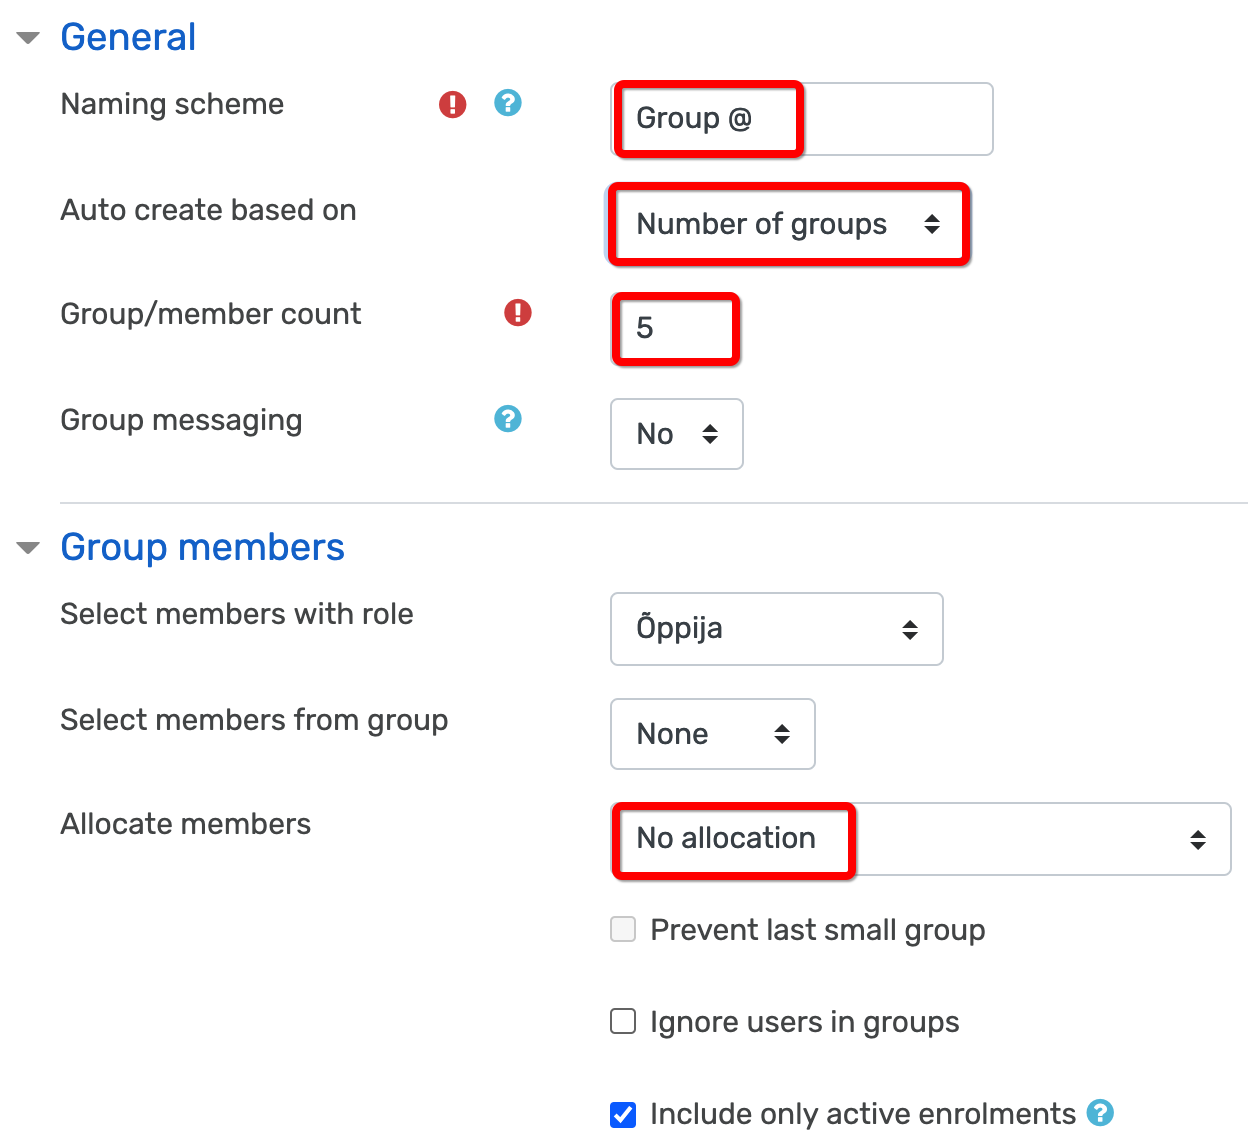
2. Auto-creating emty groups (see picture)
- On the groups page: Administration – Users – Groups
- click Auto-create groups and specify the suitable settings. Using @ in the group name creates groups using a naming scheme with letters: e.g. Group A, Group B, etc. If you include # in the group name (e.g. Group #), the auto-created group names will use the naming scheme with numbers (e.g. Group 1, Group 2, etc.)
- to create empty groups (so that learners could choose their own group), select No allocation

To edit the names or settings of existing groups, click on the group name and the button Edit group settings.
To enable learners to self-enrol into groups, create the groups and add the Group self-selection activity to the course. This module allows you to specify the number of learners in groups (in the menu on the left Max members per group and the enrolment period Open from and Open until).
Groupings
To create groupings, go to the groups page (Administration – Users – Groups), select the tab Groupings and click on the button Create grouping. To assign groups into the grouping, click on the people icon in the column on the right.


