
MOOC: Instrumental analysis of cultural heritage objects
2.1. Light microscopy
In optical microscopy, visible light (i.e. electromagnetic radiation in the visible spectrum range with wavelengths between 400-700 nm) is transmitted through or reflected from the sample through a single lens or multiple lenses, creating a magnified view of the sample. Fig. 1 presents a typical scheme of a light microscope.
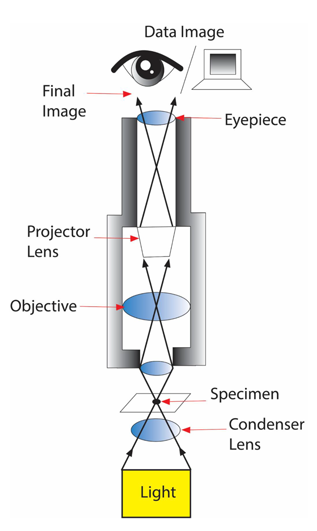
As seen in Fig. 1, the light produced by a lamp source is focused on the specimen by the condenser lens. The light diffracted by the sample is then collected by the objective lens that generates a real magnified image that is further magnified by the eyepiece or ocular. The projector lens (the one between the sample and objective) reverses light rays so that the image would not be “upside-down”.
The most important part of the microscope is a set of objectives that enable magnification in different ranges. A simple single-lens microscope (similar to a magnifying glass) can magnify a maximum of 30x. In order to ascertain the total magnification of a so-called compound microscope (consists of at least two optical components: the set of objective lens and the ocular system) you need to take the magnification of the objective and multiply it by the magnification of the ocular. [1] Therefore, formally magnification can be infinite – up to few millions.
However, keep in mind that magnification does not equals resolution, which is more important parameter! The resolution of a microscope can be defined as the smallest distance by which two points can be separated and still be distinguished as separate objects. The smaller the resolution value is, the higher is the microscope’s resolving power, and thus, the better are the clarity and detail of the image. Shortly – resolution describes the ability to see fine details.[2] Diffraction restricts the ability of optical instruments to distinguish between two points separated by a lateral distance less than approximately half the wavelength of light used to image the specimen. [3] This limits the practical magnification to about 1500× and the resolution to approximately 0.2 mkm.
There is a variety of light microscopy techniques available. Samples can be analysed with transmitted light, reflected light and via stereomicroscope where a 3D image can be observed. [4] Also there are different imaging modes like bright-field and dark-field in the microscopes that can be used. Bright-field is the normal mode in the light microscope. With transmitted light, the contrast is obtained through variations of colour and optical density in the sample. Dark-field mode (often used with reflected light) eliminates unscattered light, then background light becomes about zero, and high image contrast is possible.[4]
For better observation of the samples, different type of illuminators (for example, ring light illuminator, so-called single or double gooseneck fiber optics illuminator, etc.) are also possible to add to the microscope. Nowadays, there are different microscopes with various additional accessories available. It is possible to select a suitable microscope based on your samples and research interest.
A light microscope can be used for the examination of different types of materials.
Paint analysis
For a paint analysis it is possible to obtain information about pigment and filler particles (colour, size, shape) and based on that, preliminary identification of the pigment can be made. Paint samples taken from the painting or polychrome objects (sculptures, altars, coats of arms, etc.) usually have many layers. A cross-section block of the paint sample piece can be prepared to observe the layered structure. For that, the paint sample piece is embedded entirely into a liquid polymer (e.g. polyester or polyacrylate resin, epoxy resin, etc.). After polymerization, a hardened block has been formed. The block is then polished until it is as smooth as glass.
Cross-section of a paint sample can be used to determine (a) the sequence, colour and thickness of paint, primer, varnish and glue layers; (b) the diffusion of binders or pigments from one layer to another; (c) possible overpaintings; (d) condition of the paint, primer and other layers. More about that topic can be seen in the video.
This kind of analysis provides valuable information about the artists’ painting techniques and for conservators information about the structure and conditions of the painting layers. As an example, Fig. 2 presents images of cross-section samples, which shows that in some periods, there have been numerous overpaintings.
.")
Textile fibres
An optical microscope is a useful tool for analysing and identifying textiles and fibres. Microscopy is a quick and easy technique to observe how different fibres are knitted in the fabric, what kind of defects or degradations are in the cloth, evaluate the condition of the textile, examine various pollutants on the fibre [5], etc.
Microscopes are also widely used to identify the type of fibre. Many natural fibres like cotton, linen, wool, jute etc., have under a microscope a characteristic visual appearance that helps their identification (see Fig. 3). For example, sheep wool and other animal fibres are distinguished by a wide round-shaped cross-section and uneven fibre surface, which looks like it is covered with scales. Cotton fibre can be determined due to its flat cross-section and apparent twist along with the fibre. Bast fibres like linen, hemp, jute can be identified by the nodes along with the fibre.
.")
As a rule, synthetic fibres are smoother and more uniform than natural ones. Under a microscope, they are often shiny and resemble plastic wires and thus are not very well identified (see Fig. 4).

In practical aspects, fibre analysis can be done with two different approaches to sample preparation. One is to observe fibres under the microscope without any treatment. Another common approach is to, at first, immerse fibre threads in glycerine (or glycerine-ethanol mixture) and then place them between two microscope slides. The latter method enables fibres to absorb the solution, dilate and, thus makes the surface details of the fibre more visible.
Archaeological objects
Optical microscopy is a valuable tool also for examination of different archaeological objects and materials like lithics (stone objects), ceramic objects (vessels, pottery), metal items (weapons, tools and ornaments), leather and textile (clothing, footwear, storage facilities, etc.), bone objects (tools, weapons, also buttons).
For example, for lithics materials, microscopical use-wear (microwear) analysis [6] has been carried out for identifying the function of ancient artefacts. Additionally, use-related residue analysis employing various microscopy methods of different organic (e.g. starches, plant tissues) and inorganic (e.g. phytoliths) microfossil remains attached to or soaked into stone objects has been employed to identify the ancient usage of lithic artefacts [7–11]. Also, there are various amorphous residues (incl. food residues) attached to or found together with man-made objects (ceramic vessels) or even ecofacts (dental calculus). Microscopic analysis is also helpful for identifying both animal and plant tissues attached to various objects.
For ceramic and metal items investigations, microscopic analysis for structural studies analysing thin and polished sections with optical microscopy (including scanning electron microscopy (SEM), see more in section 4.1. SEM-EDS) is one of the major approaches for identifying provenance and manufacturing technology. [12]
Various microscopies are used in textile and leather studies to identify the initial sources and production techniques. Each animal species or a wider group of animals, including their wool, hair and leather, as well plant fibres, have their specific diagnostic microscopic features used in that kind of identification [13].